lundi 3 décembre 2012
Vive Github Pages!
Ce blogue est déménagé à l'adresse loicseguin.github.com
Pour faire une histoire courte, je n'ai pas eu le temps d'écrire des articles de blogue depuis belle lurette, et j'ai tenté de vivre avec moins de Google. Dans le futur, les rares articles de blogue seront envoyés sur mon nouveau blogue hébergé à l'aide du service Github Pages.
mercredi 21 décembre 2011
Dictionnaire français pour Vim
Vim possède un correcteur d'orthographe. On peut l'activer avec
:set spell
puis on passe à l'erreur suivante avec ]s.
Par défaut, seuls des dictionnaires anglais sont fournis avec MacVim. Installer un dictionnaire français se fait automatiquement si on définit la variable spelllang pour le français :
:set spelllang=fr
Ensuite, il ne reste plus qu'à activer la correction automatique et à regarder MacVim se connecter à un serveur ftp pour y télécharger les fichiers nécessaires.
Information trouvée dans les archives de comp.editors sur usenet (http://newsgroups.derkeiler.com/Archive/Comp/comp.editors/2006-04/msg00241.html).
Information trouvée dans les archives de comp.editors sur usenet (http://newsgroups.derkeiler.com/Archive/Comp/comp.editors/2006-04/msg00241.html).
dimanche 13 juin 2010
64 bits Python installation on MacOS X Snow Leopard
N.B. : Pour une raison mystérieuse, j'ai rédigé cet article en anglais. Désolé pour ceux qui ne lisent pas l'anglais. J'essaierai de ne pas recommencer.
Here is how I installed Python 2.6.5 on my machine. Here is what I get at the end:
- Python 2.6.5 with both 32 bits and 64 bits executables
- Virtual environments with virtualenv
- 64 bits NumPy, SciPy and Matplotlib
- A bunch of other useful packages
- The power of Python
I based myself mostly on this post by Jesse Noller and this one by HyperJeff. Unfortunately, the instructions in these posts were not completely sufficient for me and I had to fiddle around a lot to get the complete setup I was looking for.
Python
Download the latest Python source code and unpack it
$ curl -O http://www.python.org/ftp/python/2.6.5/Python-2.6.5.tar.bz2
$ tar jxvf Python-2.6.5.tar.bz2
To build an installer for Snow Leopard, we need to tweak one line of the
script.
$ cd Python-2.6.5/Mac/BuildScript/
$ mvim build-installer.py
Here, I used MacVIM to edit the file. Use whatever editor you like. At
line 78, replace
SDKPATH = "/Developer/SDKs/MacOSX10.4u.sdk"
by
SDKPATH = "/Developer/SDKs/MacOSX10.6.sdk"
And around line 139 replace
if DEPTARGET < '10.5':
by
if DEPTARGET < '10.7':
Before running the script, I had to create the directory where
third-party sources would be downloaded.
$ mkdir ~/Universal/other-sources
All you have to do, is to run the script:
$ ./build-installer.py --dep-target=10.6 --universal-archs=intel
This will build an installer for 64 bits Python 2.6.5 with support for
readline. The disk image containing the installer is located in
/tmp/_py/diskimage/. Just mount the dmg file and install Python by double clicking on the pkg file.
By default, python is a symlink to the 32-bit version, and so is pythonw.
To change that, simply modify the symlinks in
/Library/Frameworks/Python.framework/Versions/2.6/bin/ as follow:
$ cd /Library/Frameworks/Python.framework/Versions/2.6/bin/
$ sudo rm python python2.6 pythonw pythonw2.6
$ sudo ln -s python2.6-64 python
$ sudo ln -s python2.6-64 python2.6
$ sudo ln -s pythonw2.6-64 pythonw
$ sudo ln -s pythonw2.6-64 pythonw2.6
Virtualenv
This nice utility allows one to have many different python environment
each of which is independent. You can then install a bunch of packages
in an environment. If you need a fresh environment, you then just create
a new virtualenv. You are free to switch from one virtualenv to another.
Start by installing easy_install and pip.
$ curl -O http://peak.telecommunity.com/dist/ez_setup.py
$ sudo python ez_setup.py
$ curl -O http://pypi.python.org/packages/source/p/pip/pip-0.7.2.tar.gz
$ tar zxvf pip-0.7.2.tar.gz
$ cd pip-0.7.2
$ sudo python setup.py install
Then, move on to install virtualenv and a wrapper script.
$ sudo pip install virtualenv
$ sudo pip install virtualenvwrapper
Create a directory for you virtual environments.
$ mkdir -p ~/local/virtualenvs
Add the following to your ~/.bash_profile.
export WORKON_HOME=$HOME/local/virtualenvs
source /Library/Frameworks/Python.framework/Versions/2.6/bin/virtualenvwrapper.sh
workon default
Source the .bash_profile file.
$ . ~/.bash_profile
Finally, just create the default virtual environment.
$ mkvirtualenv default
Numpy and SciPy
These two are by far the most annoying (but also the most useful). They depend on a few libraries which are either required or enhance efficiency a lot.
Download and install gfortran.
$ curl -O http://r.research.att.com/gfortran-4.2.3.dmg
Download and install FFTW.
$ curl -O http://www.fftw.org/fftw-3.2.2.tar.gz
$ tar zxvf fftw-3.2.2.tar.gz
$ cd fftw-3.2.2
$ ./configure CC="gcc -arch i386 -arch x86_64" CXX="g++ -arch i386 -arch x86_64" CPP="gcc -E" CXXCPP="g++ -E"
$ make
$ sudo make install
Download and install UMFPACK.
$ curl -O http://www.cise.ufl.edu/research/sparse/umfpack/UMFPACK-5.5.0.tar.gz
$ tar zxvf http://www.cise.ufl.edu/research/sparse/umfpack/UMFPACK-5.5.0.tar.gz
$ curl -O http://www.cise.ufl.edu/research/sparse/UFconfig/UFconfig-3.5.0.tar.gz
$ tar zxvf http://www.cise.ufl.edu/research/sparse/UFconfig/UFconfig-3.5.0.tar.gz
$ curl -O http://www.cise.ufl.edu/research/sparse/amd/AMD-2.2.1.tar.gz
$ tar zxvf http://www.cise.ufl.edu/research/sparse/amd/AMD-2.2.1.tar.gz
In the file UFconfig/UFconfig.mk, uncommment lines 284 through 287 and add
-DNCHOLMOD to the UMFPACK_CONFIG variable on line 154.
F77 = gfortran
CFLAGS = -O3 -fno-common -no-cpp-precomp -fexceptions
BLAS = -framework Accelerate
LAPACK = -framework Accelerate
The Makefile for UFconfig needs to be changed at line 28 in the install
target. There is a mistake on the location of the library. The line should
read
$(CP) libufconfig.a $(INSTALL_LIB)/libufconfig.$(VERSION).a
Then, build and install the various parts.
$ cd UMFPACK
$ make library
$ sudo make install
$ cd ../AMD
$ sudo make install
$ cd ../UFconfig
$ make
$ sudo make install
This will build UFMPACK, AMD and UFconfig and install the headers and
libraries in /usr/local.
Download NumPy from the SourceForge download page
http://sourceforge.net/projects/numpy/files/NumPy/1.4.1/numpy-1.4.1.tar.gz/download and then install it.
$ tar zxvf numpy-1.4.1.tar.gz
$ cd numpy-1.4.1
$ python setup.py build
$ python setup.py install
Download SciPy from the SourceForge download page
http://sourceforge.net/projects/scipy/files/scipy/0.8.0b1/scipy-0.8.0b1.tar.gz/download and then install it.
$ tar zxvf scipy-0.8.0b1.tar.gz
$ cd scipy-0.8.0b1
$ python setup.py build
$ python setup.py install
Matplotlib
Download from http://sourceforge.net/projects/matplotlib/files/matplotlib/matplotlib-0.99.3/matplotlib-0.99.3.tar.gz/download and untar.
$ tar zxvf matplotlib-0.99.3.tar.gz
$ cd matplotlib-0.99.3
The file make.osx is what is used now. However, as of this writing, using this file as is does not work. First, apply this patch
http://sourceforge.net/tracker/download.php?group_id=80706&atid=560722&file_id=369204&aid=2981126
and then change the zlib version in make.osx to 1.2.5. Then, run
$ PREFIX=~/local/virtualenvs/default make -f make.osx fetch deps mpl_build mpl_install
Other useful packages
$ pip install mercurial
$ pip install ipython
$ pip install networkx
$ pip install nose
$ pip install sphinx
$ pip install sympy
References
http://matplotlib.sourceforge.net/users/installing.html
http://blog.hyperjeff.net/?p=160
http://docs.python.org/install/index.html
http://cran.r-project.org/bin/macosx/tools/
http://mail.python.org/pipermail/pythonmac-sig/2009-May/021289.html
http://jessenoller.com/2009/03/16/so-you-want-to-use-python-on-the-mac/
lundi 7 juin 2010
Consommation d'énergie et émission de gaz à effet de serre au Canada
En faisant quelques recherches sur Internet, je suis tombé sur des données relatives à la consommation d'énergie et à l'émission de GES par les foyers canadiens pour la période de 1990 à 2007. Ces données sont rendues publiques par l'Office de l'efficacité énergétique de Ressources naturelles Canada. Elles proviennent principalement de Statistique Canada.
Les données sont disponible sous la forme d'un document Excel (res_ca_1_e.xls). J'ai utilisé Python, Matplotlib et un module nommé xlrd pour visualiser les données. Python et Matplotlib n'ont probablement pas besoin de présentation. xlrd est un module qui permet d'extraire les information d'un fichier Excel à partir de Python. Une introduction à l'utilisation de xlrd est disponible sur scienceoss.com. Mon script Python est disponible ici.
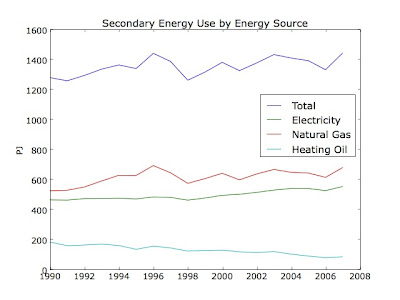

Je dois avoué avoir été assez surpris du faible taux d'augmentation de la consommation d'électricité et des émissions de GES. Bien sûr, il est navrant qu'on parle d'augmentation alors que les objectifs du protocole de Kyoto étaient de réduire les émissions de GES par rapport à celles de 1990. Néanmoins, si l'on en croit ces données, la situation n'est pas si terrible au Canada.
lundi 1 mars 2010
Spinify 2.2
Je viens tout juste de lancer la nouvelle version du logiciel de simulation numérique du modèle d'Ising Spinify. La version 2.2 comporte plusieurs corrections de bogues de même qu'une réécriture complète de l'interface en ligne de commande (CLI). Vous pouvez télécharger le programme sur bitbucket: spinify-2.2.tar.gz.
L'usager peut maintenant configurer tous les paramètres utilisés dans la simulation de même que dans la génération des graphes. Ces paramètres peuvent être spécifiés à la ligne de commande ou dans un fichier de configuration qui sera lu par le programme. Tous les détails sont disponibles dans la page de manuel de spinify(1).
De plus, cette version introduit de nouvelles quantités mesurables lors de la simulation. L'usager peut maintenant choisir parmi l'énergie interne par site, la magnétisation et la susceptibilité magnétique. Autant d'outils pour analyser le comportement du modèle aux abords de la température critique (de même que pour trouver cette température critique).
Enfin, j'utilise maintenant GNU Autotools pour compiler le logiciel. En théorie, Spinify devrait compiler sans problème sur n'importe quel système Unix ou Linux.
Si vous utilisez ce logiciel et que vous avez des commentaires ou que vous avez des questions à son propos, n'hésitez pas à me contacter par l'entremise de la liste d'envoi spinify-discuss@googlegroups.com.
Inscription à :
Articles (Atom)